BowNut Report post Posted March 27, 2010 Check this out guys! Always wondered when we would be able to do it ourselves. camodipkit.com I may need to give this a try. Or timbersedgecamo.com for a better step by step video Share this post Link to post Share on other sites
PSEps Report post Posted March 28, 2010 That is gonna come in handy!!! Let me know how it works when someone experiments with it. Derek Share this post Link to post Share on other sites
gauchoand Report post Posted March 28, 2010 I saw this timberedge stuff awhile ago wondered when it would show up here its pretty well reviewed on some other websites. Although with a little more exploring you can get a lot more for the money. Share this post Link to post Share on other sites
akuritone Report post Posted March 28, 2010 I bought this kit a few weeks ago and have done a couple things. I have the predator brown. I did the faceplate of a little satelite stereo first for practice. It came out pretty good. It's amazing how this stuff wraps nearly every contour of the piece you are dipping. For some reason this faceplate looked very good untill i sprayed it with the included clear topcoat. The pattern started to seperate in some places and bubble up.(maybe it wasn't dry enough). The next thing I dipped was my buddies TC stock and forearm. These two pieces came out very nice. As you can see on the forearm, there are some places where the pattern deforms a little. To me its acceptable for a DIY job. Lastly(30 minutes ago), I began dipping the individual parts of my tripod. These are just a few. This is the first metal object I have tried as it requires a different primer and paint than the plastic pieces. The instructions call for an etching primer and urethane paint. I went to Ace and purchased some automotive primer and rustoleum paint. It seems to stick better to this than to the plastic/composite things I have done. Lightly sand paint before dipping! Like anything that requires paint and finishing, the prep work seems to be the most important step. If you lightly rough up the surface just before dipping it definitely helps. The actual camo film is transparent in some of the pattern which is why it is necessary to paint the surface before dipping. The paint shows under the pattern and creates one of the colors. In my pattern the lightest color is the paint. After a little research..it looks as though the only parts of this kit that aren't easily available(Ace hardware) are the activator and the actual film. Some company on Ebay sells both individually. It is about 50 bucks for appx 15 feet of film(you get 6-7 feet with kit) and another 50 bucks for a quart of activator(maybe 8 oz with kit). If you buy the quart most likely you will need some means to spray the liquid. The activator in the kit comes in a spray can. These are just my findings and my experiences. None of these pieces are perfect! If you are a perfectionis have a pro do it! Your results may be different. Don't kill the messenger Jeff Share this post Link to post Share on other sites
j-rod Report post Posted April 1, 2010 Great post akuritone! Your stuff looks good! Post a pic of that tripod when you get it done and reassembled... Share this post Link to post Share on other sites
Broken Wheels Report post Posted April 1, 2010 Folks, don't let Jeff fool you as he is a profectionist in everything he does and I am more then pleased with the results from my TC stock and forend. In comparing it to the factory camo stock and forend I have I do not see much of a difference if any. I am not patient enough to do these types of projects (though I will sit in a stand in 22N on a late archery bull hunt from 5am till 6pm never once getting out of a tree) so if there is one thing you need to have it is patience! Great work Akuritone!! Share this post Link to post Share on other sites
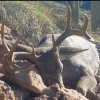
akuritone Report post Posted April 4, 2010 Here is a picture of the completed tripod. Jeff Share this post Link to post Share on other sites
tinwall Report post Posted April 22, 2010 for those who are interested - the camo dip kits are on sale for $99 at www.camodipkit.com Share this post Link to post Share on other sites
tinwall Report post Posted May 14, 2010 anyone else do this? Share this post Link to post Share on other sites
tinwall Report post Posted July 11, 2010 I just got a new kit in the military camo Share this post Link to post Share on other sites
tinwall Report post Posted July 26, 2010 anyone have more pics? Share this post Link to post Share on other sites
tinwall Report post Posted October 25, 2010 anyone still reading this thread? Would love to see some more pics... Share this post Link to post Share on other sites
hunterdude Report post Posted November 2, 2010 Send them! I would like to see what can be done! Share this post Link to post Share on other sites
Broken Wheels Report post Posted November 2, 2010 Get Akuritone to send pics of the Browning A Bolt he jsut did for me! Awesome, awesome job again... Share this post Link to post Share on other sites
willhunt4coues Report post Posted November 2, 2010 I have the Duracoat paint with airbrush and whole kit coming but I bught my own Airbrush. Check out this website you can do some crazy camo jobs. It also has a self lubricant to help the gun. I like the wrap you guys are talking about but it seems this is a little more permanent if you read up on the dip compared to the paint. Just my 2 cents I will show you work when I am all finished. http://www.lauerweaponry.com/ Share this post Link to post Share on other sites